General
Set up and configuration
Manage users
Troubleshooting
Registers
Manage content
- Delete document
- Edit, review and approve process
- Edit, review and approve policy
- Create and publish new policy
- Create and publish new process
- Previous item version information
- Edit roles
- Edit release notes
- Hide items (archive content)
- Introduction to release management
- Manage document
- Manage regulations
- Publish multiple changes (in one release)
- Publish single item (manage changes)
- Download and print content
- Delete role
- Delete policy
- Delete process
- Delete or archive regulation
Audits
Training Resources
Business units
- Guide new business unit set up
- Working example 1 - locking down content access to 2 separate items
- Working example 2 - want all staff to view content yet only one group can edit
- Existing business unit review and configuration
- Guide ongoing business unit maintenance
- Manage business units for registers
Reports
Required Reading
Work Instructions
Mobile Phone App
Comments
Existing business unit review and configuration
This article applies to customers that have used Business Units (BUs) before March 2024 and currently have Business Units setup in the system.
Before you review your Business Units, please refer to the important information below:
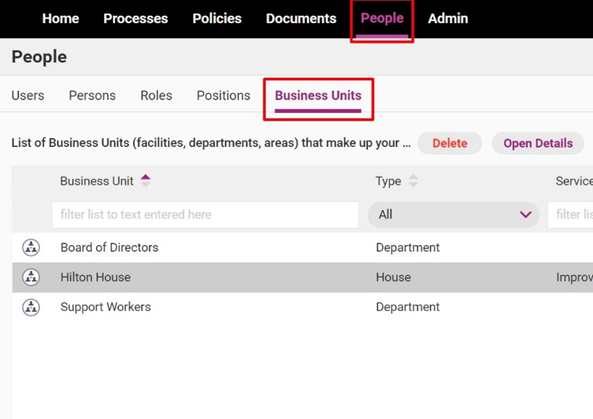
The Business Unit subtab has moved. It is now located under the People tab. All your existing Business Unit information can be found here.

All existing Business Units have been set up with the default setting Anyone in org can view and edit – this means that any user in the system can edit and view web app content that has been assigned to this Business Units. The steps below to review and edit your Business Units.
Step 1: Review and edit Business Unit access
Tip
A Business Unit can be created for a specific House (eg. Smith Street House), Facility (eg. Smith Family Services) or Department (Support Workers).
1. Access the People tab, click on the Business Units sub tab. Double click on the BU you want to edit.
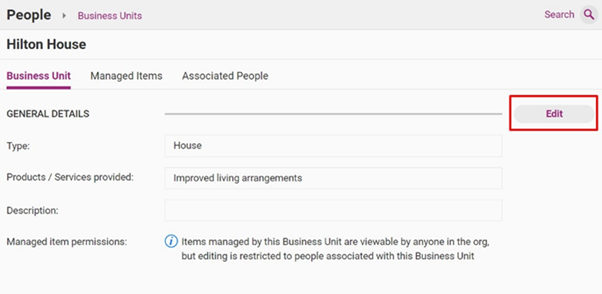
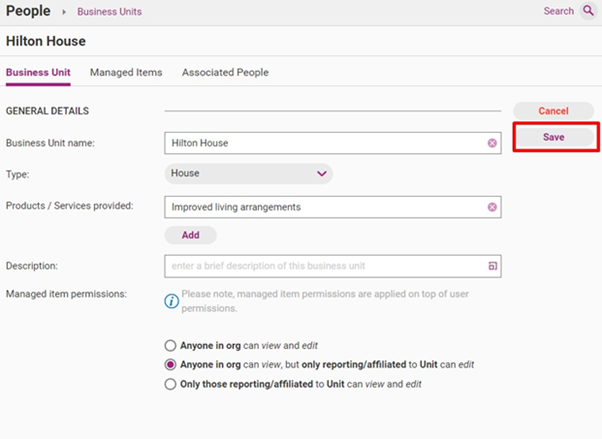
2. Click Edit and make required changes.
Field | Description |
|---|---|
Business Unit name | The name of your Business Unit. |
Type | The type of Business Unit (i.e., House, Facility or Department) |
Products/services provided | A list of the services or products that the Business Unit provides |
Description | An overview of key information about the Business Unit. |
Managed item permissions | The viewing and editing permissions of the people linked to this Business Unit, options include:
Please note, that the viewing and editing permissions above will be applied on top of existing permissions |
3. Click Save.
Tip
Once created, Business Units can be assigned to relevant content in the web app, including:
- Policies
- Processes
- Documents
- Work Instructions
- Regulations
- Register items (incidents, complaints, improvements feedback)
Initiate editing of relevant items to assign the Business Units to those items.
Tip
There will be no change to Internal Audits. This function already has the ability to select a Business Unit. All users with the permission set to ‘view/edit Internal Audits’ will continue to see all audits regardless of the BU selected.
Step 2: Link users to BUs
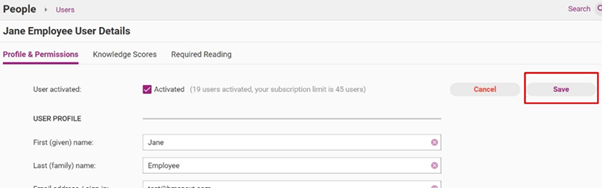
1. Go to People > Users and double click on the relevant user.

2. Scroll down to Affiliated Business Units and click Add.
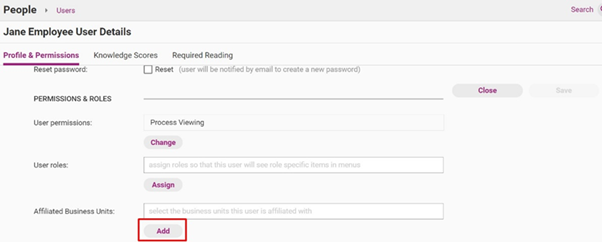
3. Select the BU that applies to the user.
4. Click Save.
Tip
- For new customers still yet to onboard your employees, please reach out to [email protected] and our team can assist in performing a Bulk Upload which includes Business Units under the User tab. This includes sending out ‘Welcome’ email invites.
- Regardless of the BU settings turned on, the user will still need to have ‘Edit’ capability to be able to edit content in the web portal (see Manage Users for more information)
More information on managing users, please see our Manage Users Guide.
Step 3: Link content to Business Units
Tip
This article uses a policy as an example, but you can attach Business Units to a variety of content including:
- Policies
- Processes
- Documents
- Work Instructions
- Regulations
- Register items (incidents, complaints, improvements feedback)
Please see the instructional guide related to the item type you would like to edit for more detailed editing guidelines.
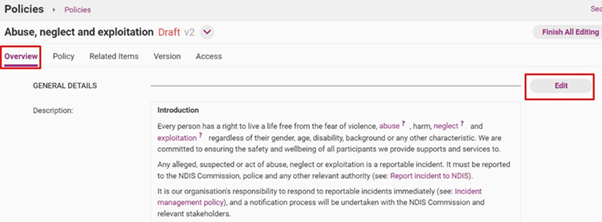
1. Find the relevant item in your Centro web app and start editing. If you require assistance with this step, please see our content editing guides for further information.
2. Click Edit and Overview Tab.
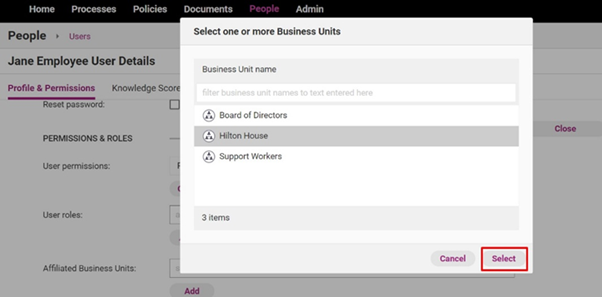
3. Scroll to Managing Business Unit and click Select.
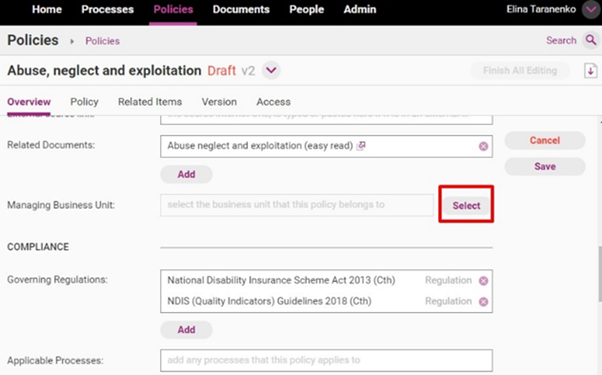
4. Click on all the BU for the content item and click Select.

5. Approve and publish the item (for more information see Publish Single Item)
Tip
Once a BU is assigned to an item, this may change which users can view and edit the content, based on the BU they have been assigned.
For reference, each BU has one of the following permissions:
- Anyone in org can view and edit – this means that any user in the system can edit and view web app content that has been assigned to this BU.
- Anyone in org can view but only reporting/affiliated to unit can edit – this means that any user in the system can view web app content assigned to this BU, but only users linked to this BU can edit.
Only those reporting/affiliated to Unit to view and edit – this means that only users linked to this BU can view and edit any content associated with this BU.
Step 4: Final review of Business Unit setup
Once you complete setting up Business Units, it is recommended that you go back into the People tab, click on the Business Units sub tab and review all content and associated people that have been assigned to the relevant Business Units.
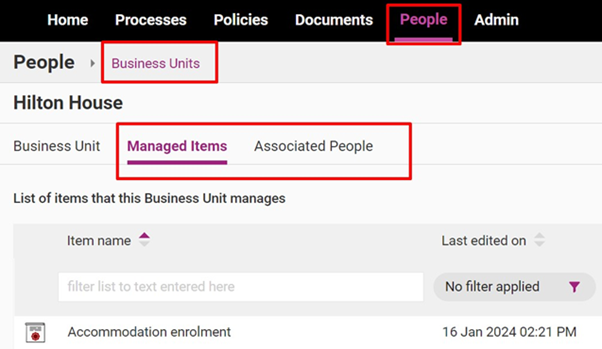
Managed Items
This tab provides a summary of each content item that has been assigned to the Business Unit, including last edited and next review dates. If you have selected the wrong content items to be assigned to this Business Unit, select ‘OPEN’ and follow step 3 in this guide to edit the item.
Associated People
This tab provides a summary of each team member that has been assigned to the selected Business Unit. This includes the level of access that has been granted based on the Business Unit settings and Position is setup.
Tip
If you have required reading, setting up Business Units may impact what different users can see.
It is recommended that the Administrator review any content that is completely locked down within a BU and check if any of these content items overlap with content assigned to a Role.