General
Set up and configuration
Manage users
Troubleshooting
Registers
Manage content
- Delete document
- Edit, review and approve process
- Edit, review and approve policy
- Create and publish new policy
- Create and publish new process
- Previous item version information
- Edit roles
- Edit release notes
- Hide items (archive content)
- Introduction to release management
- Manage document
- Manage regulations
- Publish multiple changes (in one release)
- Publish single item (manage changes)
- Download and print content
- Delete role
- Delete policy
- Delete process
- Delete or archive regulation
Audits
Training Resources
Business units
- Guide new business unit set up
- Working example 1 - locking down content access to 2 separate items
- Working example 2 - want all staff to view content yet only one group can edit
- Existing business unit review and configuration
- Guide ongoing business unit maintenance
- Manage business units for registers
Reports
Required Reading
Work Instructions
Mobile Phone App
Comments
Manage users
QMS web app administrators can choose which personnel within their organisation can access the QMS. They also have the ability to temporarily deactivate and/or delete users.
User access level | Powers related to Manage users |
|---|---|
Administrator | Can manage and invite new user |
Invite new users
Administrators can invite people in your organisation to access the QMS.
Tip
The number of people you can invite will depend on the number of user licenses that have been assigned to your organisation. Contact Ageing Australia at [email protected] if you need to review the number of user licenses for your organisation.
Step 1
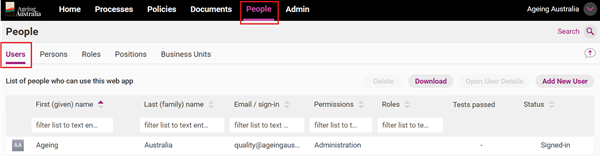
Click the People.

Step 2
Click on Add New User in the top right-hand corner of the screen.

Step 3
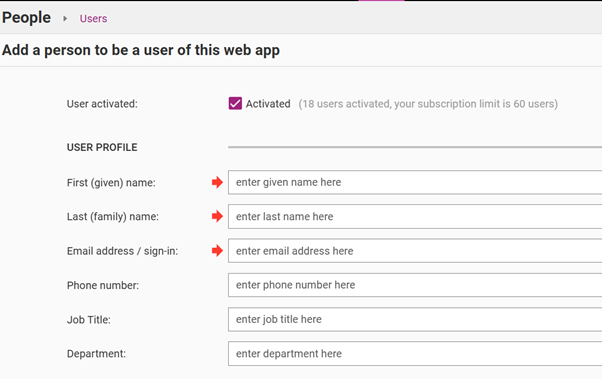
Enter the user’s details into all the relevant fields.
The only compulsory fields are shown using the red arrows and are First (given) name, Last (family) name and Email address/sign in.
The other User Profile fields (phone number, job title and department) are optional and do not impact the functions of the QMS.
Step 4
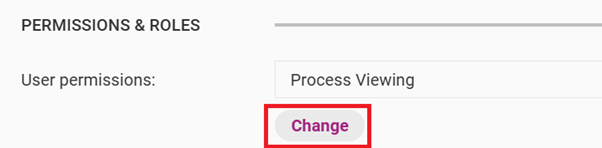
Click Change under User permissions and choose the permissions you want to give the new users. The system will default to Process Viewing level access if no other option is selected.
The below table explains the differences in User Permission levels. Note that the permission level options available on your system may differ depending on which additional modules and functions you have enabled.
Permission | Description |
|---|---|
Process Viewing | Gives users the ability to:
|
Policy Editing | Gives users the same permissions as Process Viewing and also the ability to create/edit:
Editor level approvals also allow users to download reports. |
Process Step Editing | Gives users the same permissions as Process Viewing and also the ability to create/edit:
Editor level approvals also allow users to download reports. |
Process Editing | Gives users the same permissions as Process Viewing and also the ability to create/edit:
Editor level approvals also allow users to download reports. |
Risk Viewer | Gives users the ability to view risks (if enabled). |
Risk Editing | Gives users the ability to:
|
Report Downloading | Enables the downloading of all items and reports, where possible. |
Incident and Improvement Manager | Gives users the same permissions as Process Viewing and also the ability to view, create/edit:
Incident and Improvement Managers can also download Register reports. |
Audit Data Entry | Gives users the ability to download, complete and upload audits. |
Audit Approval | Gives users the same permissions as Audit Data Entry and also the ability to:
Audit Approvers can also download Audit reports. |
Model Administration | Gives users all the rights of administration but without the ability to view/edit QMS users. Model Administrators are also able to see all content items (including Registers) regardless of their status and whether restrictions are enabled through Business Units. |
Administration | Gives users access to all permissions, including the ability to view/edit web app users. |
Step 5
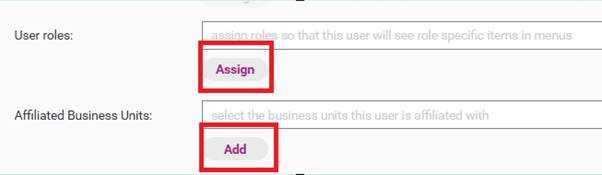
Optional: add in Roles and Business Units
You can assign the User Roles and Affiliated Business Units by clicking Assign and/or Add.
Refer to Set Up and Configuration page for more details.
Step 6
Click Save & Send Invite.

Step 7
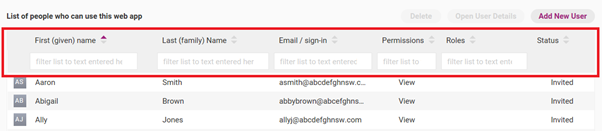
The new user will now appear in the Users menu as Invited.

Once you have added the user, they will receive an invitation email. They will be able to log on to the QMS by following the prompts in this email.
Reset password
You can resend an invitation email to a staff member at any time. Using this email, they will be able to set up their account on the QMS, if they have not already done so or reset their password.
Step 1
Go to the People tab and access the Users sub tab.
Step 2
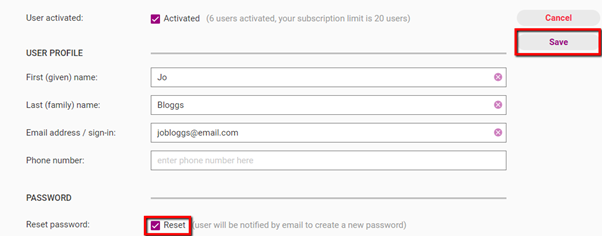
Double click on the Users name to open their details. Check on the user's name and check the Reset box and click Save.
Search and filter users
For accounts with many users, you can search for users using the top search bars. You can also filter users by:
- First (given) name
- Last (family) name
- Email/sign-in
- Permissions
- Roles
- Activity status.
Temporarily deactivate user
Deactivating users is helpful when a staff member no longer needs access to your QMS, however you want to retain data about them on the QMS (i.e. required reading and/or knowledge test data). Deactivated users will not add to your overall user allocation and will still show on your User list.
Step 1
Click on the user’s name in the People menu and select Open User Details.

Step 2
Uncheck the Activated box.
Step 3
Click Save.
Step 4

To reactivate user, check the Activated box and click Save.
Delete user
Deleting a user will remove them from your QMS and the User list. This will also remove the required reading and knowledge test data for that User.
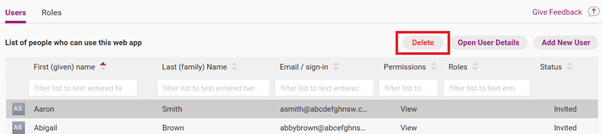
Step 1
Single click on the user’s name in the People menu and click Delete.
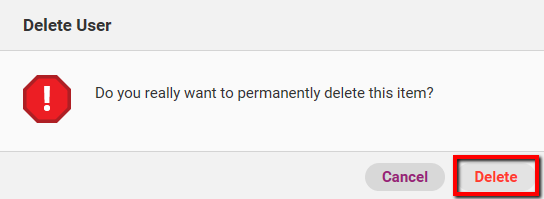
Step 2
You will be presented with a prompt. Click Delete to permanently delete the user.
Note – deletions cannot be revered.